Monday, February 20, 2012

Travel Wallet

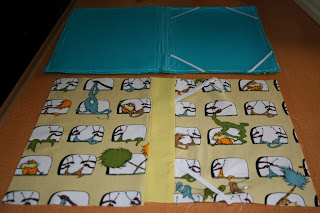
Before my trip to WDW I needed to make at least one more thing!  I wanted a little travel wallet for my Mickey Mouse bag while visiting the parks.   
I started by making a template with the seam allowance accounted for.   Template was 9" by 4 1/2."  I'd say that it worked out perfectly!  I use whatever paper is in my recycle pile.  A much better use of paper than what's printed on it more than half of the time.
Like many of my projects lately I ventured into my scrap box and found some beautiful fabrics.  I cut them all 1 1/4 by 4 1/2.  I cut too many for each to have a 1/4 seam on each side so I varied the sizes to create a slightly uneven pattern.  I seem to be drawn to using all the colors of the rainbow these days.
Travel wallet
After all the pieces were sewn together I had a bright idea.  What about an outside pocket for the card I will use the most!  Brilliant!  I had some extra fabric because of all the extra seams so I could create a pocket.  I  took the seam out between the two pieces and turned each side to create the pocket.  And like always I used teal as my inside.
Travel wallet
I sewed the pieces together and turned them.  After adding a stitch around the entire piece I folded over the pocket and sewed them again.
It worked out perfectly!  I'm not quite sure how that happened but it did! 
I'm super happy with the results.  This little wallet will be perfect for my travels.  After my trip I plan to use it for my frequent buyer cards.  Now off to Florida for an adventure!

- Bryn

Sunday, February 19, 2012

Kindle case version 3.0

3rd time's a charm!  Version 1.0 - too big.  Version 2.0 - too small.  Version 3.0 - just right!
This time I went with a bookcase look for my digital bookcase. 
And all the pictures are sideways again.  I tried multiple times to get them straight to no avail.
This time I started with a paper layout of my bookcase.  I wanted 3/8 inch border around the kindle when it was finished.
 I went through my scrap collection and found some great fabric to use.
I cut the "books to size and placed the "wood around the edges to get an idea for what it will look like.
Made two sides, one light and one dark. for the covers of the case.
I used the light side for the front cover and the dark side for the back cover.  Looks good!
The inside covers were made from another Disney text print.  This time I used Peter Pan.  
To make the covers more stable I used a thick fusible interfacing.  On the inside cover I also used some batting to cushion the screen. 
I'm finally happy with version 3.0.  I love the cover on the first one.  The inside of the second one is fantastic.  The third one is the right size and the cover is unique and the inside looks great.  I think I'm finally done making Kindle covers for myself.  Maybe I'll start making them for Etsy.  

-Bryn

Saturday, February 18, 2012

Kindle version 2.0

So far two kindles and two covers.  I replaced my first kindle within the week because I lost a couple pixels on it.  Took it back to Target and they replaced it no problem!  So now I have Kindle Fire 2.0 and now I need case 2.0!
Kindle Case
 I found some fantastic Lorax fabric and knew that I needed to use it for my case.  My last case I made too large.  I needed to bring down the size.
Kindle Case
Another issue with my last case was the elastic.  It was a bit too thin and it didn't hold the case very well. The elastic worked much better this time and I only make one little mistake installing it.  
Kindle Case
The other fabric I knew I needed to use was some Disney text print.  The text I used was from Pinocchio.  It says "Star Light, Star Bright, the first star I see tonight. 
Kindle Case
Well well...  The case is now a little too small!  
With my excitement in finding some cute fabrics I found out that they really don't work well together.
Kindle case version 3.0 here I come!

- Bryn

Friday, February 17, 2012

How I spent my Valentine's day

I'll have to say that my motivation has been low lately.  My life has had many changes of late and it has been tough dealing with all of them.  Most of my days have been spend online all day, watching TV or reading.  Not much action on the craft front I'm afraid.
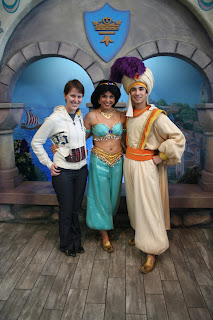
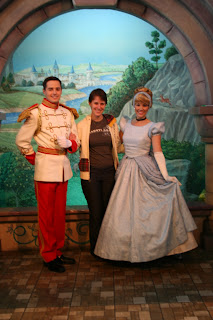
Did I make anything on Valentine's day?  No!  I went to Disneyland instead.  Only one day a year they bring out all the Princes and Valentine's day is that day.  Off to Disneyland I went to play before work and took photos with the Princesses and Princes.
Disneyland
Prince Ali and Jasmine 
Disneyland
 The Giant Beast and Belle
Disneyland
Prince Naveen and Tiana 
Disneyland
 Princess Aurora and Prince Phillip
Disneyland
 Prince Charming and Cinderella
Disneyland
Snow White and the Prince
Three of those poor princes don't even have a real name, The Beast, Prince Charming and The Prince from Snow White.  It was great to see all of them.  The only couple I didn't get a picture with was Ariel and Eric. But I did grab a picture of them from a friend in line.
Disneyland
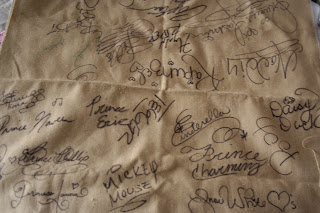
I suppose I didn't go the whole day without at least planning a craft.  I brought a piece of fabric to make a pillow out of.
Disneyland
I had the characters autograph the fabric.  I showed some of my friends from work and a couple of them suggested embroidering them.  What a great idea!  It would take forever but it would be awesome when it is done.  
Next week I'm off to collect more autographs in Florida at Walt Disney World with my mom.  We are also going to visit Universal Studios for Harry Potter.  I'm ready for a total geek out!
I'm going to make a new case for my Kindle before my vacation.  The first one I made ended up being too big and the elastic was not strong enough.  Another project for another day.

- Bryn

Saturday, February 4, 2012

Winnie the Pooh Ornament

I loved making the felt ornaments so I needed to continue and make more!  Winnie the Pooh's Hunny pot.  A friend of mine made one for our work Christmas tree and I just had to make one of my own!   And just in time for Valentine's day.
Disney felt ornament
I found a drawing one of many of Winnie the Pooh's Hunny pots and cut it out.  I went through my collection of felt and found some colors that worked out very nicely.  
Disney felt ornament
I wanted the added dimension for the lid so I created two pieces to make the jar.  Later I added the white Hunny banner.
Disney felt ornament
 It wouldn't be right if it didn't have some honey in the pot.  Poor Pooh is always low on honey, but not at my house.
Disney felt ornament
It turned out great.  Such a cute little ornament to have on the Christmas tree or out all year long.  I mean who doesn't love Winnie the Pooh
Disney felt ornament
Now how many different Disney ornaments can I make?!  Lots!

Thursday, February 2, 2012

Blog redo

I have a lot of things I want to rework on my blog.  I'm going to take a couple days off to work on a new look. I'll be back with many more projects soon.
- Bryn