Monday, May 28, 2012

From book to coaster

It's time for another craft made out of books!  I ran across a picture of coasters that were made out of book pages and I knew it was something that I needed to try. 
I started experimenting with page sizes to create at 4 inch by 4 inch coaster.  I ended up cutting each page 4 inches by 3 inches.  2 inches was too thin and 4 inches was too thick.  I used a bamboo skewer to roll each piece.
 When I had rolled about 2 inches of paper onto the skewer I spread glue on the remaining paper with a glue stick.  Another flashback to childhood, using a glue stick.
 Continue rolling you paper until it fits snugly on the skewer.  I found that putting a healthy amount of pressure once it rolled up helps keeps the ends together.  I might try using rubber cement next time.  The glue sometime came apart.  
After sliding the piece off the skewer I put two rolls of paper together with bobby pins.  I painted on Mod Podge on the top once I had selected the best part of the roll to face the top of the coaster.
 I only found 10 bobby pins in the house so this part of the project took a long time.  If you have more bobby pins you might be able to glue it all together at the same time.
 Finally it's all together.  I did an extra coat of Mod Podge on the top because of the liquid that could get on them.  Once the top was dry I flipped it over and did a layer of Modge Podge on the back.
 Ta Da!  4 super cool, upcycled, unique book coasters.
Harry Potter pages coasters
 With my projects so far I've made it though about 1/4 of my book.  So many more project ideas are just waiting to move from my mind into reality.

Saturday, May 26, 2012

From books to flowers

I continue to be intrigued with crafts made from books.  I have seen paper roses for years and always wanted to try to make my own.  I made a couple before with the template below without coloring the paper and they turned out great.  This time I went for some color.  
Harry Potter roses
  I found this template online.  The flowers turned out fantastic.  I recommend her website.  She has tons more flower tutorials that I will probably try soon!
From Ellinee
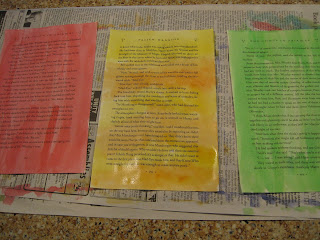
I bought some simple watercolors.  I felt like I was in elementary school all over again.  The colors were not the best but at least they worked.
Harry Potter paper roses
  I colored five pages, let them dry, taped them together on the sides and traced on the patterns.  The water color did not bleed through so it was easier to trace on the backside of the paper.
 To add some additional texture they recommend curling the edges.  I did it by curling just like ribbon with a pair of scissors.  To create the interior of the rose I used a bamboo skewer and curled the pieces around the center.

Once the center was done it was time for the bigger petals.  I glued each piece together by the side tab.  I took the smaller of the two pieces and glued the bottom and place it inside the large petal.
And repeat until all the layers are complete!
The end result is amazing!  Each one is pretty different, especially the centers.  I really love how the color did not pass through to both sides of the paper.  It adds unexpected texture to each rose.
 For now they are sitting in a pitcher.  What I will do with them after that, who knows!

Wednesday, May 23, 2012

Books into gift tags

From some of my other paper projects I ended up with some scraps.  I can't part with some piece that could become something else.  I've been inspired by Pinterest as many crafters have recently.  I found some upcycled craft tags.  
 I cut my squares approximately 2 inches by 3 inches.  Some scraps were a little bigger or smaller so  For some stability I also cut white cardstock as backers.
 After the pieces were cut out including the two top corners for the top of the tag I glued the pieces together.  Some of the pieces did not quite match up.  They just needed a little trimming.  The final touch were some stamps on the book pages. 
After all that I added a whole punch at the top for string to go through to attach to gifts in the future.
As always I have more ideas for these little guys with some distress ink and some new and different stamps and book pages.  Maybe even some fancy eyelet to replace the simple hole punches.  It's a great scrap project.  Now I will probably never throw any craft paper pages away.

Friday, May 18, 2012

Book crafting

All the time that I have spent away from working on my blog and crafting I have been reading.  I got my library card back in Johnson County and I have already maxed out my hold list!  And from my reading I have become fascinated with paper crafts from books.  I started with one book to see what I could make from it.
To remove all the pages I used a box cutter.  The edges are certainly not perfect but for most of the projects they don't need to be.
I tried to keep the hardbound cover intact for another project.  There is a small cut on the spine from some over zealous cutting but I might end up covering it with fabric.
I have a couple books around the house that I can use and I bought a couple from the used book store.  Maybe I'll find some more this weekend around the neighborhood garage sales this weekend.  My adventure will be seeing how many crafts I can make out of one book.  I have a feeling it is going to be a lot.
I'm looking forward to playing around with paper for a while.  I'm still truly enjoying reading so much that my crafts are intermittent and small.  But hey if they are small then I might actually get to finish them.

Saturday, May 5, 2012

One thing turns into another

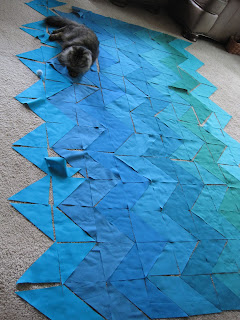
My chevron quilt has become the master bedroom quilt.  This chevron quilt was going to be a throw for me but it became a whole other project in the process.  I had 8 colors to use and I had to figure out how to arrange them.  I just laid them out in two different ways using my scraps as a guide.  I decided on the top one.  
The color progression.  No surpise that I ended up doing a color order instead of random.  It's my style.
As I was laying out my quilt I had a little helper.  My mom's cat Bela boy was a big helper.  By helping he was really good at moving all my pieces around.  Good job kitty.
Chevron ombre quilt
Overall I like the look of the quilt.  It's now time tow cut out many more triangles of quilt since the size has increased.  
Chevron ombre quilt
Chevron quilt in all blues and greens with a little help from the cat.  It's a good thing!

Wednesday, May 2, 2012

Let the assembly begin!

I love starting another project.  And this time I've got a brand new cutting mat too!  My poor last cutting mat had been used so much that the self healing top was flicking away.  It's nice to start anew in a new place with a new mat!
I liked the chevron quilts that I have seen around the web.  I decided to go with all solids in the same color family, teals, blues and greens fabric from a defunct project.  About a yard and a half each.  Time to cut the triangles and put them together in the chevron pattern.  Triangles are frequent in many of my more recent projects.
To get an idea what it was going to look like I laid it out on the counter.  Looks good.  
Four rows down with many more to go.  Gotta start somewhere!